Showing posts with label Hair Technical File. Show all posts

Friday, 22 April 2016

Stencils and Sprays

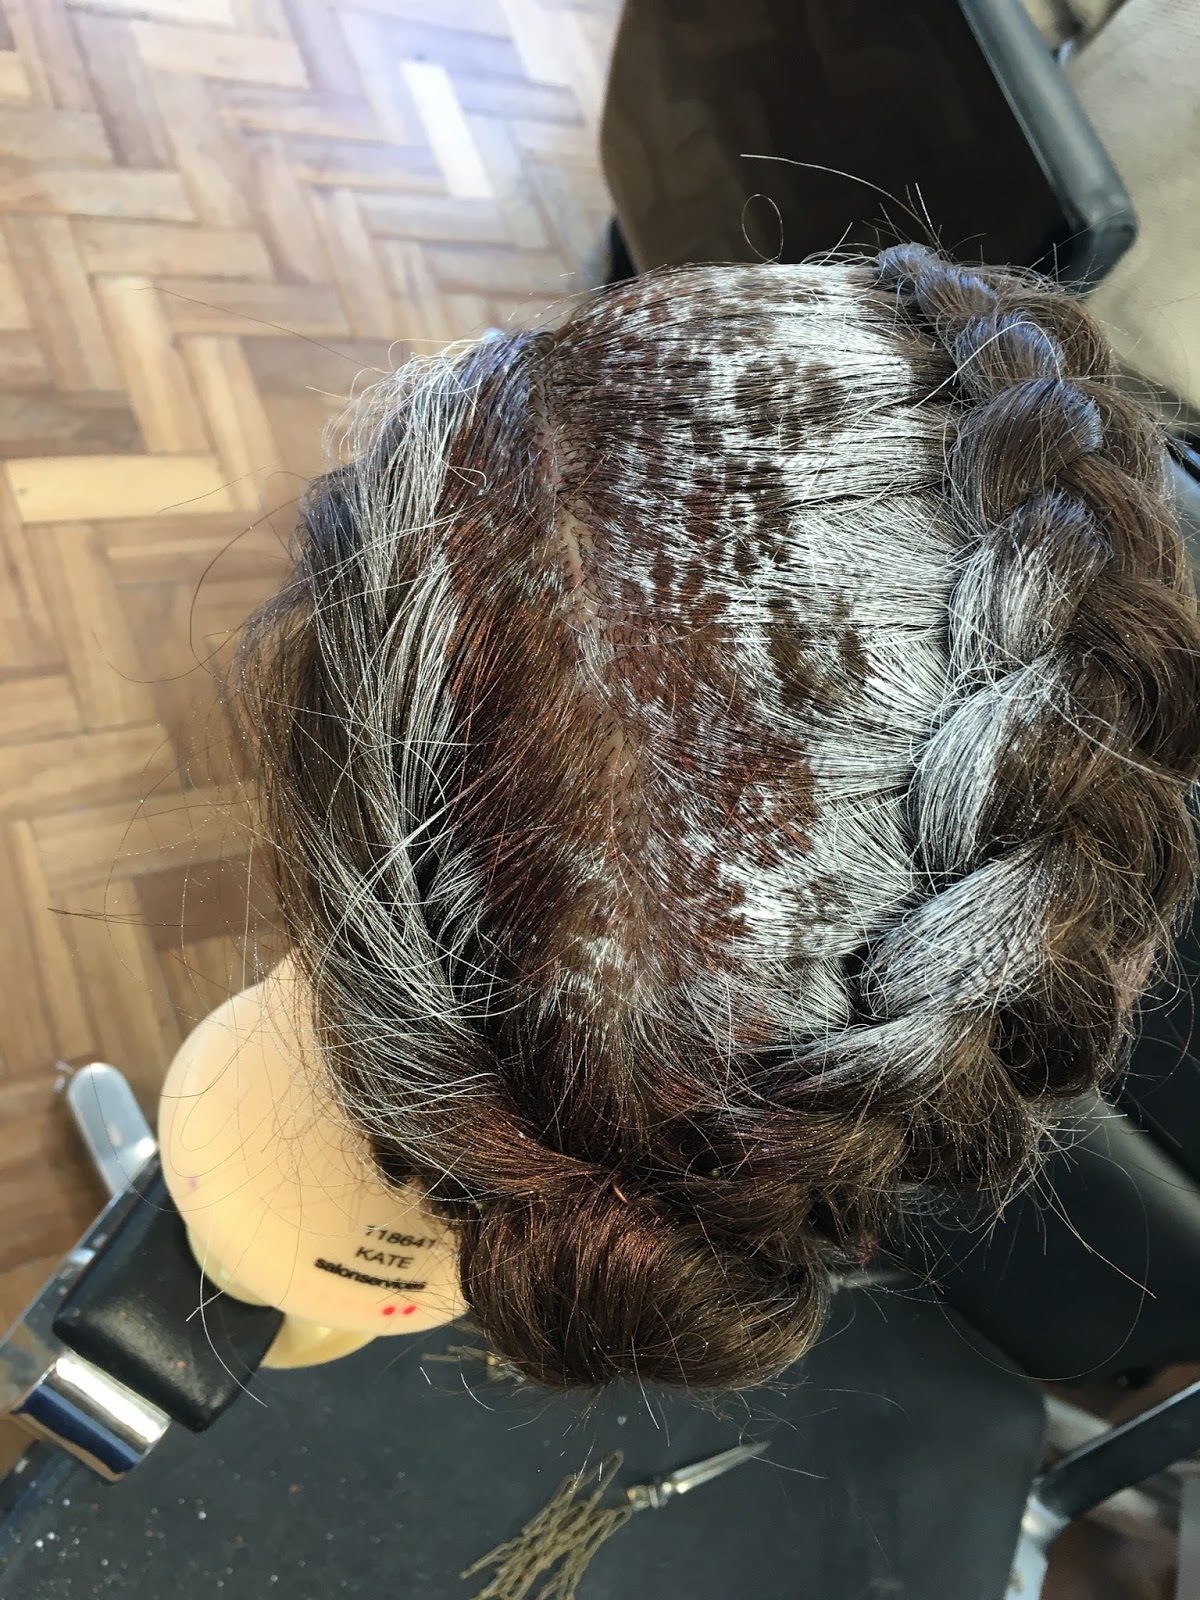
We had another lesson that allowed us to experiment with using stencils and sprays. We could do whatever hairstyle we wanted and then have fun with the sprays.

TOOLS
- Pintail comb
- Hairbrush
- Hairpins
- Hair bands
- Kryolan Sprays
- Lace
- Aqua Colour


Initially I wanted to just do two tight french braids on the side of my Katie head and then have the rest slicked and sprayed with the colour. However I slightly got away with myself with the braiding and ending up with a dutch braid going down the centre of the head into a bun- I think that this was a good idea as the slicked sides of the braid were good to spray with the colour. 
I definitely had trouble with the stencil on one side of the head, as I was holding the spray can too close to the head the colour was all concentrated in on one section which made the pattern not show. I think that I also should've held a bit of card over the braid to protect it from getting the colour on it. 
It would've been good to try out different colours with more lace to see how I could add more to the style, as I don't particularly like how the white looks on the hair. 

Friday, 15 April 2016

Messy Buns Inspired by Clown Hair

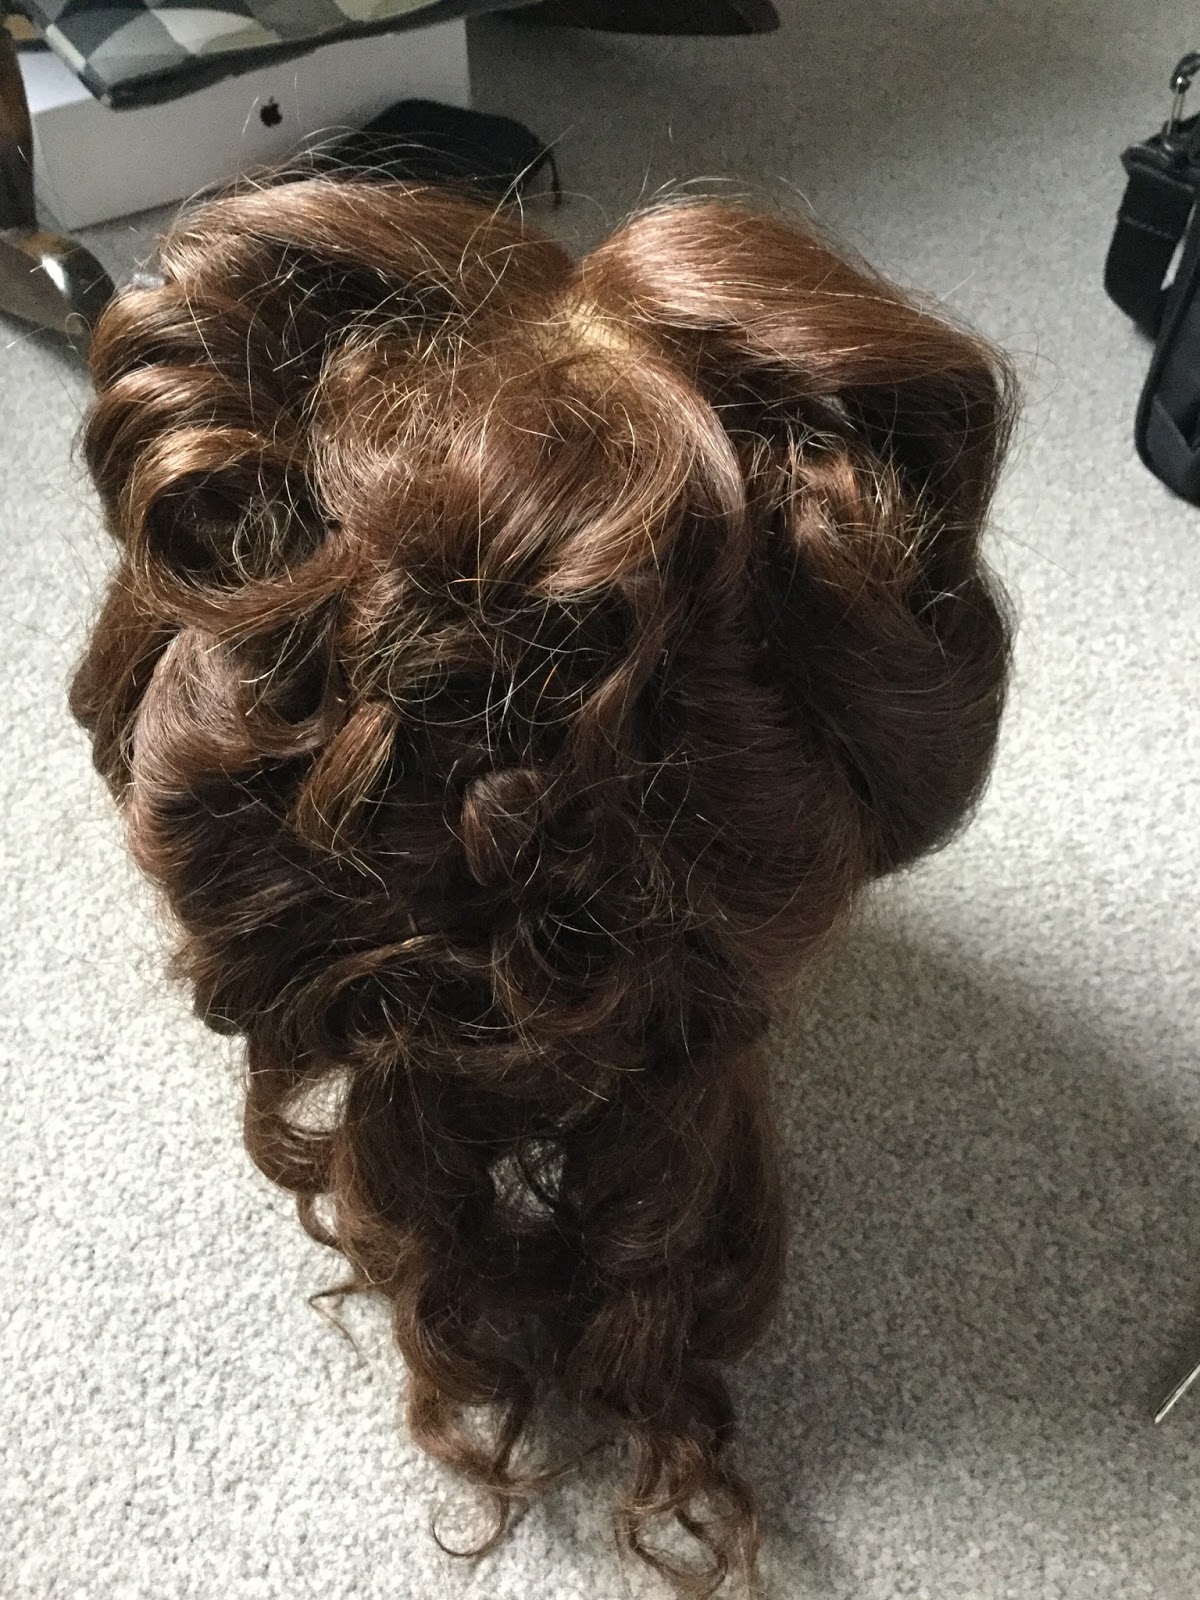
This lesson was more fun and more of an experiment to see what we could come up with during the time. We were shown some reference pictures at the beginning of hairstyles that was slightly carnival/clown-like in look and we had to create a style similar to it. 

EQUIPMENT
- Pintail comb
- Hair Bands
- Bobby Pins
- Hair Pins
- Afro Comb
- Curlers
- Hairspray
- Heat Protectant

STEP BY STEP
- Do any type of parting that you wish- I chose a zig zag. To do the zig zag parting, take the hint go the comb and draw the shape you wish on the scalp then separate the hair out. 
- Clip one section away.
- Tie the first section into a high pony tail on the side of the head. Do the same with the other side.
- Spray on heat protectant and curl the hair hanging down from the ponytail. 
- Once all the hair is curled, start backcombing- you want it to be quite messy. 
- Then pin into place, you don't want to have the conventional 'bun shape' for these, you want it to still be very messy. 
- Use hairpins to guide the hair into place and pin.
- Spray with hairspray. 

My interpretation


MY INTERPRETATION
I'm quite proud of how the final hair came out. I did have a lot of trouble with getting the zig zag parting, when I separated the hair out I wanted happy with the shape so I had to get Lottie to help me. After a few tries I managed to get the parting looking how I wanted, and I'm quite proud of the final look of it. The curlers I was using weren't the best so I couldn't get an as defined curl, however I think that because I backcombed so much I lost the curl anyway. I think that I did manage to get the buns looking pretty even, however I think that I needed to look more in the mirror to get them even more symmetrical. 


Wednesday, 6 April 2016

Hair Charts for Mrs Laderman

For my Mrs Laderman hair charts I decided to focus on having her hair down rather than doing an undo. I think that because of the makeup that I have planned for this character, I want her hair to be framing the face and as I like the 'messy' look for her hair I think this will make her look more mysterious. 

For the first hair chart I based the look upon very natural curly hair- almost similar to afro hair. I think that this hair would be quite a good look for the character because I think having her face framed by massive messy curls will create this mystery to this character- making her more interesting to look at. However I do have reservations about choosing this because my model has quite a lot of hair so it will be very difficult to curl all the hair to get it looking as I want without spending an entire day on it. I think that although this would look good practically it may not be the best design to choose. 


For the second hair chart I decided to do something a bit different and chose to do straight hair. Although it wouldn't be as messy as doing curls I think that this would make my character look very polished- which is what Hexanbiests look like in show. However because the makeup is quite dark and magical I wonder if it wouldn't go with the makeup and not add the sense of mystery that I want from the photos. 


For the final hair chart I decided to do a toned down version of the first one, with the ends being curled along with a  few mid-length sections. I think that this would be a happy medium between the other two hairstyles and much more manageable than the first one. Furthermore I think this would allow me to backcomb and create a very messy look whilst keeping it look slightly polished. 


Friday, 1 April 2016

Hair Charts for Quentin

Below are my hair charts for my Quentin character. As my model's hair is quite short, there isn't a lot that I can do with his hair, and I don't particularly need to for my portrayal of him. 

For the first hair chart, I've shown a more messy style, with his hair slightly ruffled which I will use product to make sure that it has the texture that I want. I thought that this look would be good to make it look as though he has just come out from his 'pile of thorns' and so wouldn't look terribly neat and tidy. This is my favourite of the two hair charts, as I think that it goes better with my vision for the look that I want to do for Quentin. 


 The second hair chart I did shows a much more slicked look for Quentin, with his hair looking much smarter and put-together in comparison to the previous chart. Although I like the slicked look, I don't think that it would work with my idea for Quentin- especially for the character portraits where I want to shoot him looking ruffled and defending himself. I think that choosing this hair chart would be a mistake as it wouldn't link together with the rest of the look. 


Thursday, 17 March 2016

Modern Victorian inspired by AHS

TOOLS 
- Heated Rollers
- Clips
- Bobby Pins
- Hair Pins
- Pintail Comb
- Hairbrush

PRODUCTS
- Heat Protectant
- Hairspray

STEP BY STEP
- Spray heat protectant onto the hair.
- Do a deep side parting in the hair and section it off to just behind the ear.
- Use the red heated rollers in this front section, curling the hair away from the face to create volume.
- Then 'brickwork' the back of the head to just halfway down the head using the blue rollers.
- Finally use the white rollers to curl upwards from the nape of the neck to the blue rollers. 
- Let the hair set.
-Once set, let the hair down.
- Pin the two front sections away, you won't need them yet.
- Backcomb the crown lightly.
- Section the back into three, roll each section up and bobby pin into place just at the nape of the neck. Once each section is pinned up, use hairpins to perfect them so they look like one roll. 
- Take the two sections at the front out of their pins, use the natural curl to pull back and pin into place above the rolls.
- Hairspray to finish.


MY INTERPRETATION
I'm quite proud of the final hair look, I think that it still has the kept look with the messiness as well. I did find it difficult to get the rolls right, and I did need Lottie's help with getting the hair to roll up on itself, and then I used hairpins to make sure it looked neater. Another thing that I found difficult was making sure that the bobby pins were placed so that they couldn't be seen, which was tricky with the rolls. However I think that being able to see some of the bobby pins added to the messy look of the style, but if it was less messy then it wouldn't look very good. One element that I do really like about the style is the volume that the red rollers gave the hair, so that there is a lift at the root at the front. 


Wednesday, 17 February 2016

Practising Hair design

I wanted to practise my hair design so I could figure out the steps I need to do for the timed assessment. 
As I am doing a male character, my model's hair is a lot shorter than Katie's so I sectioned off the hair from the crown downwards and tied it into a ponytail so that I could focus on the shorter sections of her hair. I then did a deep side part on her head and curled the hair in small sections - curling the hair underneath. Initially I did use a slightly thicker curling iron than I should have, which meant that although the hair did have a lot of lift, there wasn't much curl in the ends. As a result of this I changed to a much thinner curling iron, which will be the perfect size for my model's hair as it is so short, it did mean that I had to do more sections as the tong couldn't hold as much hair. This will be the first step that I will do in the timed assessment so that the hair can have time to set into place. 


After the hair was set I took the curls down, combing through the sections to mess up the hair slightly. Then in order to maintain the slick parting that was typical of Victorian men, I sprayed hairspray onto the parting and combed it through to make sure that it stayed in place. Making sure that I get the parting in exactly the same place each time I do the look will be the important element of continuity, so I will use my model's facial markers and natural parting to help. 


When Helen was checking, she did say that I was pulling the hair sections away from the hair slightly rather than holding it parallel with the face as I was curling. I need to make sure that I don't do this during the assessment as it will cause a line in the hair. Furthermore I did go slightly overboard with the amount of hairspray that I put on the hair, so I just need to make sure that I don't suffocate my model during the assessment. 


Sunday, 14 February 2016

Hair Chart for The Monster

As Frankenstein was published in 1818 I need to do an early Victorian male hairstyle. As the Monster  has gone through a lot in the book, I do want his hair to have a messy look to it in contrast with the prim and proper look that was typical of Victorian men. As my model does have quite messy hair anyway I think this will be quite easy to achieve. 
I would like to have a deep side parting in the hair, using gel to make sure that it stays in place. I think that I could add some rollers into the front of the hair, so that there is some lift in there but then break up the curls with my fingers so that I can achieve the messy look. 


Wednesday, 10 February 2016

Late Victorian Hair Interpretation


Last week we had to create an early Victorian hairstyle so this week we had to do a late Victorian hairstyle. Below is the inspiration that I found so I could complete my hairstyle.
Hair styles photos » 1879 hair styles (no date) Available at: https://uk.pinterest.com/pin/490892428111926544/ (Accessed: 10 February 2016).
EQUIPMENT USED
- Heated Rollers
- Thin curling tongs
- Roller pins
- Hair pins
- Bobby pins
- Hair ties

STEP BY STEP
- Do a centre parting in the hair, using the pintail comb as a guide.
- Use the white rollers in the front of the hair, pick up the same size section as the roller. Wrap the hair around the roller, tucking in any ends using the pintail comb. Put in two rollers down the hairline and two rollers back. Use the roller pins to secure in place, or hair pins are an alternative.
- There are different variations of what can happen with the rest of the hair: separate the rest of the hair in half tying up the top section which can be plaited or twisted into a bun or section some of the hair at the crown with a ponytail in the middle. 
- Use the curling tong to curl the rest of the hair as decoration.
- Pin the curls into place around the bun/ponytail making it look pretty.
- Take out the front rollers, comb out to loosen the curls slightly and bring the sides back into the style. 

MY INTERPRETATION

I decided to do a style like the one in the top left of the first image. I separated out some hair at the crown which I curled to add more of a lift and definition to the hair. The hair below I plaited and twisted into a flat bun, which was the centre for the rest of the hair to be brought back into it. 


I'm really proud of how it turned out, I think that it is quite elegant and I think that it does look quite similar to the image that I have taken inspiration from. One element that I especially like is the lift that the rollers gave to the hair, along with the shape of the curl at the end. I think I prefer this style of hair in comparison to the early Victorian as I think it is a lot more intricate and glamorous. 


Wednesday, 3 February 2016

Early Victorian Hair interpretation

We had to look at early Victorian hairstyles, to see what we could use as an inspiration for our interpretation of a Victorian Hairstyle. I chose the hair that features the two plaits looping underneath the ears, as shown in the two images below.

1840’s hairstyle (2015) Available at: https://uk.pinterest.com/pin/126804545734633406/ (
Accessed: 3 February 2016).
Hair (2014) Available at: https://uk.pinterest.com/pin/334181234824060206/
(Accessed: 3 February 2016).
Tools
- Pintail comb
-Sectioning clips
- Bobby Pins
- Hair Pins
- Hair ties

Technique
- Create a center parting in the hair, using the front of the pintail comb as a pencil to draw the line.
- Comb the hair to either direction.
- Section off two pieces of hair on either side, starting from the crown and finishing just behind/just to the ears. Clip these out of the way.
- Bring the rest of the hair into a low/mid bun.
- Plait the two front sections, beginning just under the ear so there is a smooth top, loop under the ear and pin into place. 

OTHER ALTERNATIVES:
- Smooth Loop: loop the section under the ear, don't twist the hair, just pin into place.
- Curled front: Curl the front section of the hair, keep the tongs vertical so that the curls look like sausages. Curl towards the face and leave to frame the face.

My interpretation
 I did find it very difficult to get the bun correct without any flyaway hairs as Megan's hair is so short. This was a continuous problem that I had when doing the style, so the final style does look rather unfinished and messy, in the Victorian era they would've had very long hair that would make it easy to do this style. Pinning the hair into place was a problem as I needed to bobby pin the plaits into place, however as it is so short the pinning is very messy so that they would stay in place easily, furthermore the brown pins show up against the blonde in Megan's hair. I think possibly the curled style would be easier to do for the length that Megan's hair is. 
Megan and I had the same problem when executing this hairstyle on each other as we both have fringes which didn't want to co-operate with staying in the place we had sectioned them into. Helen had to help with this, so she recommended bobby pinning the fringe back on the lower layers and then hide it with the rest of the fringe. 
When Helen came around to check on the style, she did like my sectioning, however she said that I didn't go far enough forward with the two front pieces. This then made it more difficult to loop the hair underneath the ears, so I will remember this for the next time.