Showing posts with label Final Outcome. Show all posts

Saturday, 23 April 2016

Project Evaluation

I found this project really interesting, because we got to focus on the Gothic and I had the opportunity to learn something new in our Makeup sessions. Although I like learning new skills, I think that SFX makeup is definitely not my forte and all the wounds that I made during the project tended to be very theatrical rather than looking realistic. I think that on the occasions when I do need to do SFX makeup I will concentrate more on the application of the makeup to make it lighter and more believable.

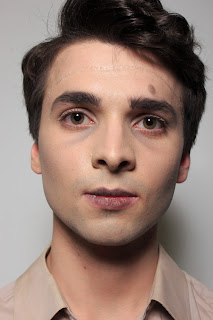
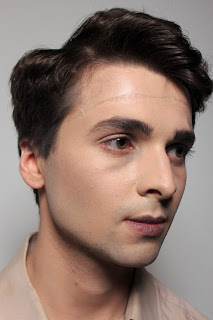
For my continuity assessment I chose Frankenstein's Monster from 'Frankenstein' by Mary Shelley - it is one of my favourite books and I wanted to do a portrayal of the Creature that was slightly humanised. I definitely needed to think more about how I wanted him to look- my idea to use Collodion to create a long scar across his forehead may not have been dramatic enough. I think that possibly Tuplast would've been a better product to use, or I should've experimented more with trying to colour the scar.  I experimented with colouring the scar and wasn’t happy with the result, perhaps I should have pursued this further. When comparing the two photos I am proud that I managed to get the makeup looking pretty similar across both Timed Assessments - however I am annoyed because I can tell the light setting is slightly different and I should've double checked that it was exactly the same before I finished taking the photos.

For the second half of the project I loved the freedom we were given to create the two characters we wanted to do for our chosen TV show, and I think I was a bit more confident in my skills by then to do something a bit more adventurous. I felt this especially with my second character- Mrs Laderman. I was apprehensive about whether my idea would actually work, however I am proud of the final result. It was quite nice to force myself out of my comfort zone! One element that was frustrating was the fake blood that I ordered from Kryolan.  It is much lighter than I anticipated so in future I think I need to do more research into the products before I buy them.


In comparison to the previous semester I felt a lot more comfortable with my blog, I think that learning from the previous project allowed me to realise how important it is to update the blog with lots of detail. Although I did a lot of research into the Gothic, my chosen book and TV series, I didn't focus enough on the work of other professionals. This may have been more beneficial to me so I could learn some other techniques and get more inspiration for both parts of the brief. If I was to do the project again I would focus on some of the smaller elements and not give up so easily - especially in terms of colouring wounds. My choice of Frankenstein’s Monster might have been slightly predictable, in retrospect I could have chosen a different character from my novel - possibly Walton, Justine Moritz or Elizabeth.

Thursday, 21 April 2016

Mrs Laderman

 Below are the final images from my shoot for my Mrs Laderman character. 


I'm quite proud of how the final images have come out, I think that the makeup looks really good and shows the character quite well. I think that if I had shot her on a white background then she wouldn't look as dark or evil.
The entire look did take a while to do, I started her hair about 9am and finished the makeup at around 2pm with breaks. I did have a bit of an issue with her hair, as she has so much of it it was very time consuming to curl the whole thing and I was slightly worried that I wouldn't be able to get the hair to look that way that I wanted it to- however I quite like the smart yet messy curls that are in the final look.
I was very worried about doing the Hexanbiest mouth as I thought that I wouldn't be able to replicate it to how looked in my practise. I am quite surprised with the final result, I did change my method to do it slightly- I blending in the edges more so that they looked less like tubes and more like stretched skin. However I did have a lot of issues with blending it in, I blended out the edges as best I could so that it didn't look as 'stuck on'. I also think that my colouring is a bit better than my practise- I think that it blends in quite well with the lipstick colour as I didn't want it to be two separate blocks of colour. One problem I did have was that some of the wax tubes did start to stick to each other, I think this is because I probably didn't put as much latex on in fear that they would fall off as they were so delicate, and I didn't powder over the top either which might have not helped.

Once I had taken some of the 'Normal' shots, I wanted to take some more 'Character-driven' photos just to capture the character I wanted to show. Below are my favourite images from the ones that I took.

I really love the picture below because of how it only highlights the half of her face that has the Hexanbiest smile on it- even though the picture is underexposed I think that it is really beautiful because it has a sense of mystery to it. I like to think of it like she has been waiting in the shadows for Claudia and Quentin and this was taken just as she is emerging.


The picture below I thought also shows her waiting, but more waiting for Quentin. There's an element of seduction in this image, almost like she is using her sexuality to lure Quentin in- however she doesn't realise that she has Woged and is in her Hexanbiest state. 

The picture below was taken at the very end of the shoot when the wax had started to rip. I wanted to pose it almost like she is screaming and her mouth is ripping because she is so angry- possibly at Claudia or at Quentin. I thought that this could be her screaming at Quentin before she pushes him into the 'pile of thorns' so this is the last thing he sees. 


For the final image, I wanted it to be almost like she is trying to look 'innocent' and 'sweet' to Claudia however there is a sinister look to her because of her mouth and the way that she is posing. I thought that the cocked head makes her look almost doll like, but there is a very creepy element to it. 


Wednesday, 13 April 2016

Quentin

Below are the final images from my character shoot for Quentin. I wanted to shoot  him showing both the cuts on his face along with covering his eyes with a bloodied bandage, I think that although the bare photo shows more of the makeup I prefer the ones with the bandage as it brings the entire look together. 
The makeup was very simple, with the cuts taking up the majority of the time to make sure that I could get them looking right. Initially I used the technique that we learnt in our lessons to dip a hairpin into fake blood to create the scratches- however it didn't look very effective on the skin when I tried; the blood kept being thicker at the point rather than creating a good even scratch. As I was getting very disheartened by this, I changed to using an angled brush which made it so much easier to get a good line and much quicker as well. One element that I am quite disappointed about is the colour of the blood- I ordered fake blood from Kryolan and chose the light colour rather than dark - I think that because they are light they look more 'angry' and slightly more theatrical. 

I'm glad I ripped and added blood to the shirt that he was wearing as well, I think that if I hadn't done this then the aesthetic of the entire look wouldn't be as good. By dirtying his shirt it makes it look more as though he fell completely into the 'pile of thorns' like in the original story. 

For his hair, I just used his natural parting and texture just to slightly 'fluff' his hair up a bit to give it a 'put-together messy look'.


For the character portrait, I wanted to show him in a defensive pose with the blindfold on to make it seem like he can't see who his assailant is (Mrs Laderman). I thought that this would show the cuts that I put on the palms of his hands, along with the bruising on his arm and hand. I thought that adding bruising to his arm and hand would make it look like defensive wounds, to show that Mrs Laderman is an abusive character along with his 'Prince' quality of defending not only himself but Claudia as well- and so relating it back to my inspirational words 'Save Us'. 
Initially I didn't want to have anyone else in the shot, however it seemed quite fake to have him posing without someone else being there. Justine offered to grab the front of his shirt, bringing in this other character into the photographs and making them look less posed and rigid and more like action shots. I definitely prefer the shots with the arm as it brings them to life so much more. 


Wednesday, 9 March 2016

Timed Assessment Part 2

Below are the final images from the second part of the Timed Assessment. I'm really happy with how they turned out, I think that I was able to replicate the look well. The images on the left are from the first TA and the images on the right are from the second TA. One element that I am incredibly frustrated about is that the brightness of the lights/flash is different in the two photos- I think this is due to how difficult it is to judge on a camera screen.
Another thing that is different between the two photos is the height of his hair, this I think is due to me lifting the curling wand more when I was curling his hair. However I think that I managed to get the shape of the hair pretty similar in the two photos. 
When looking at my final makeup, Sue did mention that I could've coloured the scar on his forehead, so that it does stand out more on the photos. However when I did practise colouring the scar it looked awful and not how I wanted it to look. As I wanted to place the Creature in the novel later on when he was living on his own and finding his own way, I didn't want the scar to look too new, so I only used the Collodian and didn't colour it. 
First TA
Second TA


Wednesday, 2 March 2016

Timed Assessment- Part 1

Below are the four final images from the first part of the Timed Assessment. I'm really happy with the final images, I think that the look is very simple but looks very effective on camera. I'm really happy with my timings for the whole look, all in all it took about an hour to do the entire look including hair, so I think that I will be able to pace myself to focus on the elements that will need extra time to make sure they are perfect- in particular; the under eyes, contouring and the scar. 


I took some close up shots for my continuity notes as well, so that I can get the placement of each element exactly the same next week when I replicate the makeup.